 |
|
 |
Call Notify
- Activate or Deactivate a Call Notify Entry
- Add a Call Notify Entry
- Modify a Call Notify Entry
- Delete a Call Notify Entry
Use this menu item on the User - Incoming Calls page to
The Call Notify service allows you to receive an e-mail notification when you receive a call.
Activate or Deactivate a Call Notify Entry
Use this procedure to activate or deactivate an existing Call Notify entry. The entry specifies the e-mail where a message is to be sent to notify you of an incoming call when it is activated. No notification is sent to an entry that is deactivated.

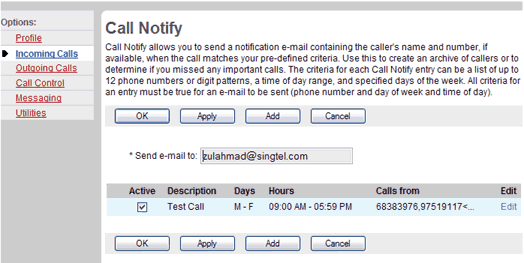
Incoming Calls - Call Notify
- On the User - Incoming Calls menu page click Call Notify. The User - Call Notify page displays.
- Check the Active check box beside the selection to activate. To deactivate this selection, uncheck the Active check box beside the selection to deactivate.
- Save your changes. Click Apply or OK. Apply saves your changes. OK saves your changes and displays the previous page.
To exit without saving, select another page or click Cancel to display the previous page.
Add a Call Notify Entry
Use this procedure to add an e-mail address where you want to receive notification of an incoming call.

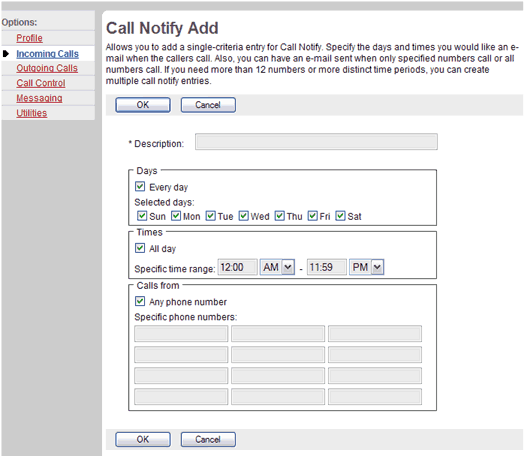
Incoming Calls - Call Notify Add
- On the User - Incoming Calls menu page click Call Notify. The User - Call Notify page displays.
- Type the e-mail address to send the notification to in the Send e-mail to text box.
- Save your changes. Click Apply or OK. Apply saves your changes. OK saves your changes and displays the previous page.
To exit without saving, select another page or click Cancel to display the previous page and exit this procedure. - Click the Add button. The User - Call Notify Add page displays.
- In the Description text, type a description of the phone numbers in this selection.
- Click the check boxes for the days to be notified for the selection. You can check Every day or if you only want call notification on certain days, check the appropriate box(es) for the day(s). When you check Every day, the boxes for all the weekdays are checked automatically. When you remove the check that pertains to a day, the check box for Every day is cleared automatically.
- Select the times to associate notification with these calls. Check the All day box if you want to be notified of calls from specified numbers 24 hours a day. Otherwise, type the start and end times, being sure to specify AM or PM.
- To have notifications of calls from any phone number sent, check the Any phone number check box. Otherwise, click your cursor in the text box and type the complete number to trigger the service. If this number is not one assigned to the group, type the complete number: +
. For example, "+1" must precede long distance numbers within the U.S. You can enter up to 12 numbers for this service. You can use wild cards (see Note). NOTE: You can use wild cards. The "?" is a wild card that can replace a single digit anywhere in a digit string. A trailing "*" represents a digit string and can only appear at the end of a string containing digits and "?" wild cards. For example: 45055512?4, 450555??34, 4505?5* are all valid entries.- To save your changes and display the previous page, click OK.
To exit without saving, select another page or click Cancel to display the previous page. - To save your changes and display the previous page, click OK.
Modify a Call Notify Entry
Use this procedure to modify a Call Notify entry.

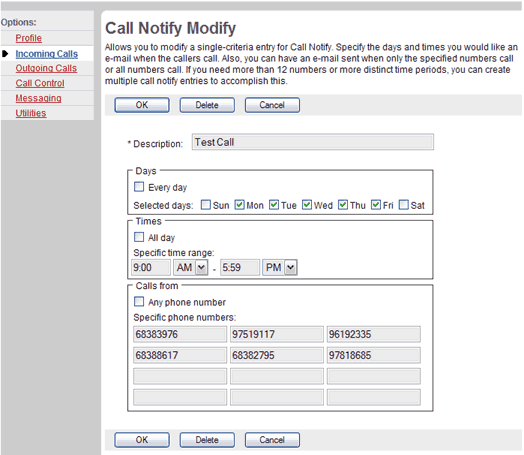
Incoming Calls - Call Notify Modify
- On the User - Incoming Calls menu page click Call Notify. The User - Call Notify page displays.
- Click Edit on the row for the entry. The User - Call Notify Modify page displays.
- Modify the information as required.
- To save your changes and display the previous page, click OK.
To exit without saving, select another page or click Cancel to display the previous page.
Delete a Call Notify Entry
Use this procedure to delete a Call Notify entry.

Incoming Calls - Call Notify Modify
- On the User - Incoming Calls menu page click Call Notify. The User - Call Notify page displays.
- Click Edit on the row for the entry. The User - Call Notify Modify page displays.
- Click Delete. The entry is deleted and the User - Call Notify page displays.
WARNING: This action cannot be undone. Once you click Delete, the instance is permanently deleted.
|
Best viewed with IE 5.0 and Netscape 6.0 & above. © SingTel All Rights Reserved.
|