 |
|
 |
Time Schedule
Use this menu item on the User - Profile menu page to:
- Add a Schedule
- Modify a Time Schedule
- Delete a Time Schedule
Use the User - Profile menu page to manage your personal profile data. Once you've logged into the system, the User - Profile page displays, which is the user's Home page. At any time you can click Home to return to your Home page.

User - Time Schedule
- Add a Schedule
Use this procedure to add a personal schedule. Personal schedules effect the following service configurations: Selective Call Forwarding, Selective Call Rejection, Selective Call Acceptance, and Priority Alert.

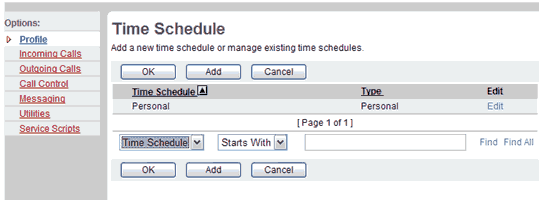
Time Schedule - Time Schedule Add- On the User - Profile menu page click Time Schedule. The User - Time Schedule page displays.
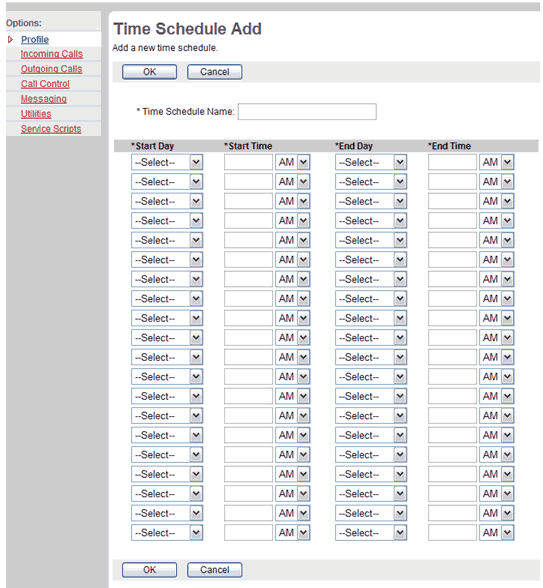
- Click Add. The User - Time Schedule Add page displays. The time schedule is composed of entries that include the day of the week, the start time, the end day, and the end time.
- Type the name of the schedule in the Time Schedule Name text box.
- From the Start Day drop-down list, select the day to start the entry.
- Type the start time and select "AM' or "PM" from the drop-down list.
- From the End Day drop-down box, select the end day of the entry.
- Type the end date and select "AM" or "PM" from the drop-down list.
- Repeat steps 3 to 6 for each entry to add to the schedule.
- To save your changes and display the previous page, click OK.
To exit without saving, select another page or click Cancel to display the previous page
- Modify a Time Schedule
Use this procedure to modify a time schedule entry.

Time Schedule - Time Schedule Modify- On the User - Profile menu page click Time Schedule. The User - Time Schedule page displays.
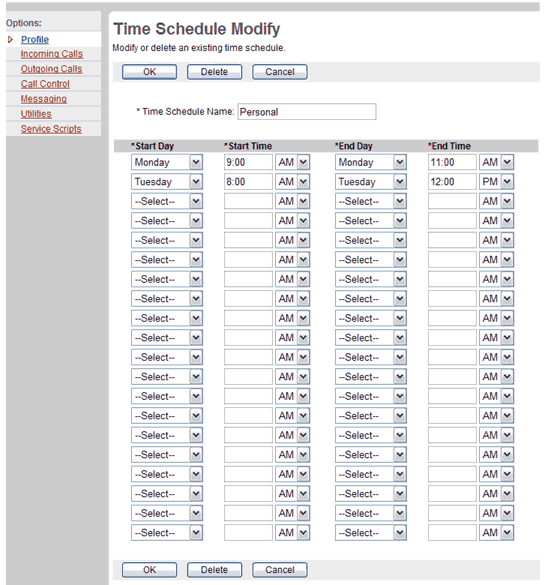
- Click Edit on the row for the entry. The User - Time Schedule Modify page displays.
- Modify the information as required.
- To save your changes and display the previous page, click OK.
To exit without saving, select another page or click Cancel to display the previous page.
- Delete a Time Schedule
Use this procedure to delete a time schedule.

Time Schedule - Time Schedule Modify- On the User - Profile menu page click Time Schedule. The User - Time Schedule page displays.
- Click Edit on the row for the entry. The User - Time Schedule Modify page displays.
- Click Delete. The entry is deleted and the User - Time Schedule page displays.
WARNING: This action cannot be undone. Once you click Delete, the schedule is permanently deleted.
|
Best viewed with IE 5.0 and Netscape 6.0 & above. © SingTel All Rights Reserved.
|