 |
|
 |
Call Forwarding Selective
- Activate or Deactivate a Call Forwarding Selective Entry
- Add a Call Forwarding Selective Entry
- Modify a Call Forwarding Selective Entry
- Delete a Call Forwarding Selective Entry
Use this menu item on the User - Incoming Calls page to
The Call Forwarding Selective service allows you to redirect specific calls.
Activate or Deactivate a Call Forwarding Selective Entry
Use this procedure to activate or deactivate an existing Call Forwarding Selective entry. Call Forwarding Selective allows you to redirect calls from selected numbers.

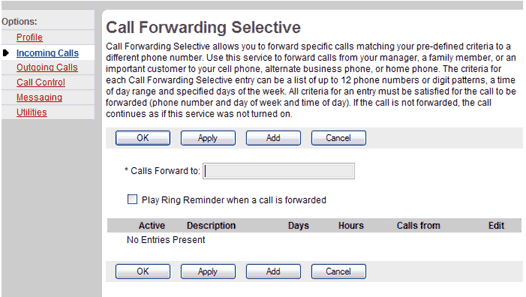
Incoming Calls - Call Selective
- On the User - Incoming Calls menu page click Call Forwarding Selective. The User - Call Forwarding Selective page displays.
- Check the Active check box beside the selection to activate. To deactivate this selection, uncheck the Active check box beside the selection to deactivate.
- Type the phone number to which to forward the calls in the Call Forward to text box.
- To associate a sound (a short burst of rings) with the delivery of forwarded calls, check Play Ring Reminder when a call is forwarded.
- Save your changes. Click Apply or OK. Apply saves your changes. OK saves your changes and displays the previous page.
To exit without saving, select another page or click Cancel to display the previous page.
Add a Call Forwarding Selective Entry
Use this procedure to add a Call Forwarding Selective entry.

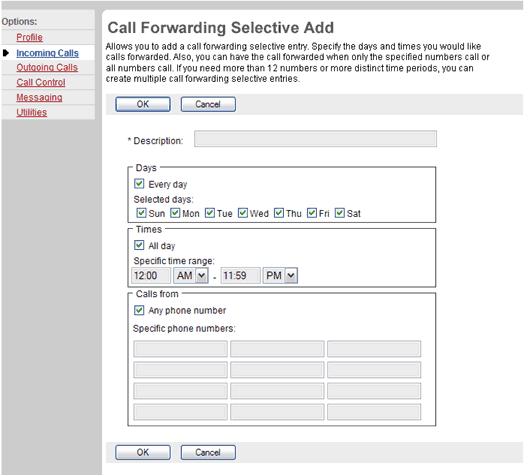
Incoming Calls - Call Selective Add
- On the User - Incoming Calls menu page click Call Forwarding Selective. The User - Call Forwarding Selective page displays.
- Type the phone number to which to forward the calls in the Calls Forward to text box.
- To associate a sound (a short burst of rings) with the delivery of forwarded calls, check Play Ring Reminder when a call is forwarded.
- Save your changes. Click Apply or OK. Apply saves your changes. OK saves your changes and displays the previous page.
To exit without saving, select another page or click Cancel to display the previous page. - Click Add. The User - Call Forwarding Selective Add page appears.
- In the Description text box, type a description of the phone numbers in this selection.
- Check the check boxes for the days to forward the selection. You can click Every day or if you only want these calls to be forwarded on certain days, check the appropriate box(es) for the day(s). When you check Every day, the boxes for all the weekdays are checked automatically. When you remove the check that pertains to a day, the check box for Every day is cleared automatically.
- Select the times for these calls to be forwarded. Click the All day box if you want calls from specified numbers forwarded 24 hours a day. Otherwise, type the start and end times, being sure to specify AM or PM.
- To have calls from any phone number forwarded, check the Any phone number check box. Otherwise, click your cursor in the text box and type the complete number to trigger the service. If this number is not one assigned to the group, type the complete number: +
. For example, "+1" must precede long distance calls within the U.S. You can enter up to 12 numbers for this service. You can use wild cards (see Note). NOTE: You can use wild cards. The "?" is a wild card that can replace a single digit anywhere in a digit string. A trailing "*" represents a digit string and can only appear at the end of a string containing digits and "?" wild cards. For example: 45055512?4, 450555??34, 4505?5* are all valid entries.- To save your changes and display the previous page, click OK.
To exit without saving, select another page or click Cancel to display the previous page.NOTE: You can modify this information at any time. Remember to save your changes. - To save your changes and display the previous page, click OK.
Note:
If Party A restricts his number from being displayed to Party B, Party B will not be able to do Selective Call Forwarding with Party A's number.
Modify a Call Forwarding Selective Entry
Use this procedure to edit a Call Forwarding Selective entry.

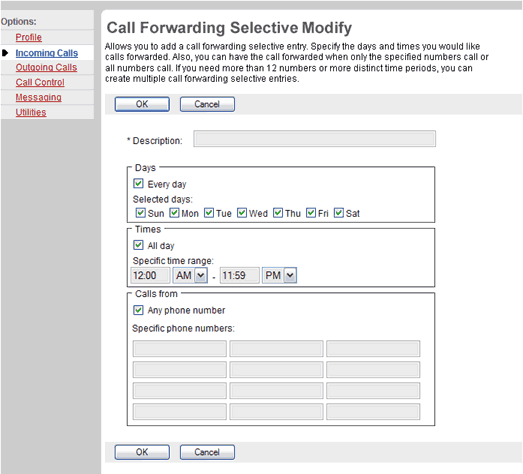
Incoming Calls - Call Selective Modify
- On the User - Incoming Calls menu page click Call Forwarding Selective. The User - Call Forwarding Selective page displays.
- Click Edit on the row for the entry. The User - Call Forwarding Selective Modify page displays.
- Modify the information as required.
- To save your changes and display the previous page, click OK.
To exit without saving, select another page or click Cancel to display the previous page.
Delete a Call Forwarding Selective Entry
Use this procedure to delete a Call Forwarding Selective entry.

Incoming Calls - Call Selective Modify
- On the User - Incoming Calls menu page click Call Forwarding Selective. The User - Call Forwarding Selective page displays.
- Click Edit on the row for the entry. The User - Call Forwarding Selective Modify page displays.
- Click Delete. The entry is deleted and the User - Call Forwarding Selective screen displays.
WARNING: This action cannot be undone. Once you click Delete, the instance is permanently deleted.
|
Best viewed with IE 5.0 and Netscape 6.0 & above. © SingTel All Rights Reserved.
|