 |
|
 |
Voice Management
- Activate and Set Up Voice Messaging
- Configure Advanced Settings for Voice Management
Use this menu item on the User - Messaging menu page to
The Voice Management service allows you to configure the handling of your voice messages.
Activate and Set Up Voice Messaging
Use this procedure to specify how you want your voice messages handled.

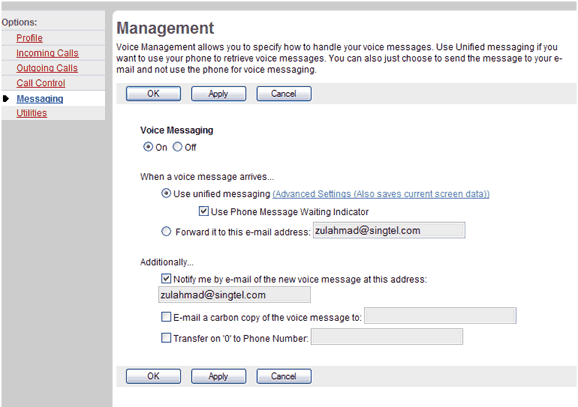
Messaging - Management
- On the User - Messaging menu page click Voice Management. The User - Management page displays.
- Click the "On" button.
- To retrieve voice messages using the phone and e-mail, click "Use unified messaging."
- If you have selected unified messaging and you want to hear a stuttered dial tone (and see a blinking light on some phones) to inform you when you have messages waiting, check Use Phone Message Waiting Indicator.
- If you always listen to your voice messages using your e-mail client and do not use the phone retrieval option, click "Forward it to this e-mail address" and type the e-mail address where you want your voice messages to be sent.
- If you want to receive a short e-mail message informing you about incoming calls, check Notify me by e-mail of the new voice message at this address and type the e-mail address where you want these notifications to be sent.
- If you want a carbon copy of your messages to be sent to another e-mail address, check E-mail a carbon copy of the voice message to and type the e-mail address where you want the copy to be sent.
- If you want callers to be able to press 0 during your outgoing voice message and be transferred to another number, such as a mobile phone or Auto Attendant, check Transfer on '0' to Phone Number and type the phone number to transfer the calls.
- Save your changes. Click Apply or OK. Apply saves your changes. OK saves your changes and displays the previous page.
To exit without saving, select another page or click Cancel to display the previous page.
Configure Advanced Settings for Voice Management
Use this procedure to configure advanced voice management settings. You can perform this procedure only if you have access to the (Advanced Settings (Also saves current screen data)) hyperlink. See your group administrator for access to this hyperlink.

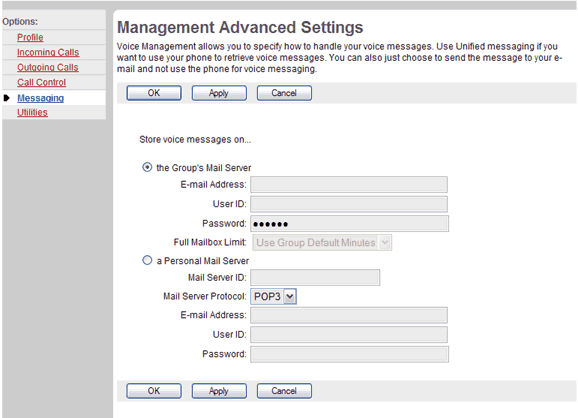
Management - Management Advanced Settings
- On the User - Messaging menu page click Voice Management. The User - Management page displays.
- Click the (Advanced Settings (Also saves current screen data)) link. The User - Management Advanced Settings screen displays.
- If you want to use a personal server for your messages, go to step 8 of this procedure. Otherwise, click "the Group's Mail Server."
- Type your e-mail address.
- Type your user ID for the group mail server.
- Type your password for the group mail server.
- Go to step 14 of this procedure.
- If you want to use a personal server for your messages, click "a Personal Mail Server."
- Type the IP address or the fully qualified name of the mail server hosting the e-mail account for your voice messages.
- From the drop-down list, select the protocol that must be used to connect to the account, either POP3 or IMAP.
- Type your e-mail address.
- Type your user ID for the personal mail server.
- Type your password for the personal mail server.
- Save your changes. Click Apply or OK. Apply saves your changes. OK saves your changes and displays the previous page.
To exit without saving, select another page or click Cancel to display the previous page.
|
Best viewed with IE 5.0 and Netscape 6.0 & above. © SingTel All Rights Reserved.
|